HxConvertSourceFile UserGuide
This guide explains how to use HxConvertSourceFile to download and convert Hexoskin data. It covers downloading multiple recordings, raw data, converting existing records, and downloading and converting data simultaneously. The guide also provides instructions for authentication, filtering data, and choosing conversion options.
Downloadin HxConvert SourceFile
To get started, you can download the HxConvertSourceFile software from the following links:
HxConvertSourceFile Authentication
-
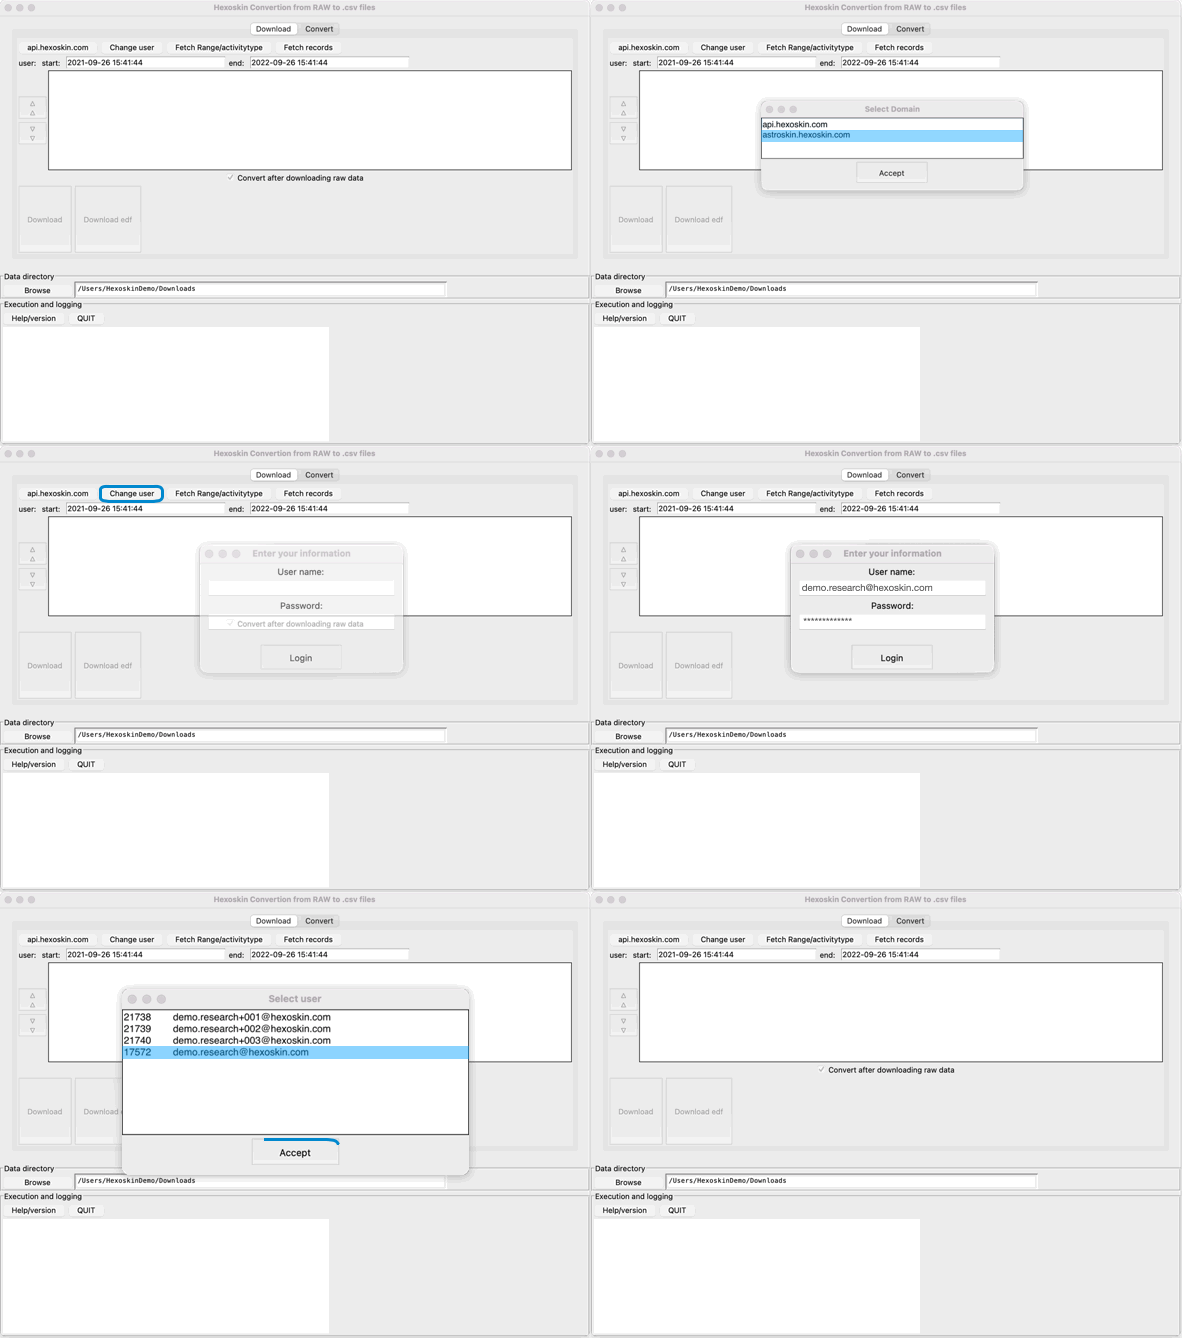
Start by selecting the Server you wish to connect to. The default is api.hexoskin.com for Hexoskin data (select astro.hexoskin.com for Astroskin data).
-
Select the Change user* button and log in with your account username and password.
*Note: If logging in with your admin account, you will then be prompted to select a "user" from your available user accounts. -
From here, you have 3 options: A) Downloading (without converting) Multiple Records, B) Converting Existing Records, and C) Downloading and Converting Multiple Records.

A) Downloading (without converting) Multiple Records
- Authenticate
-
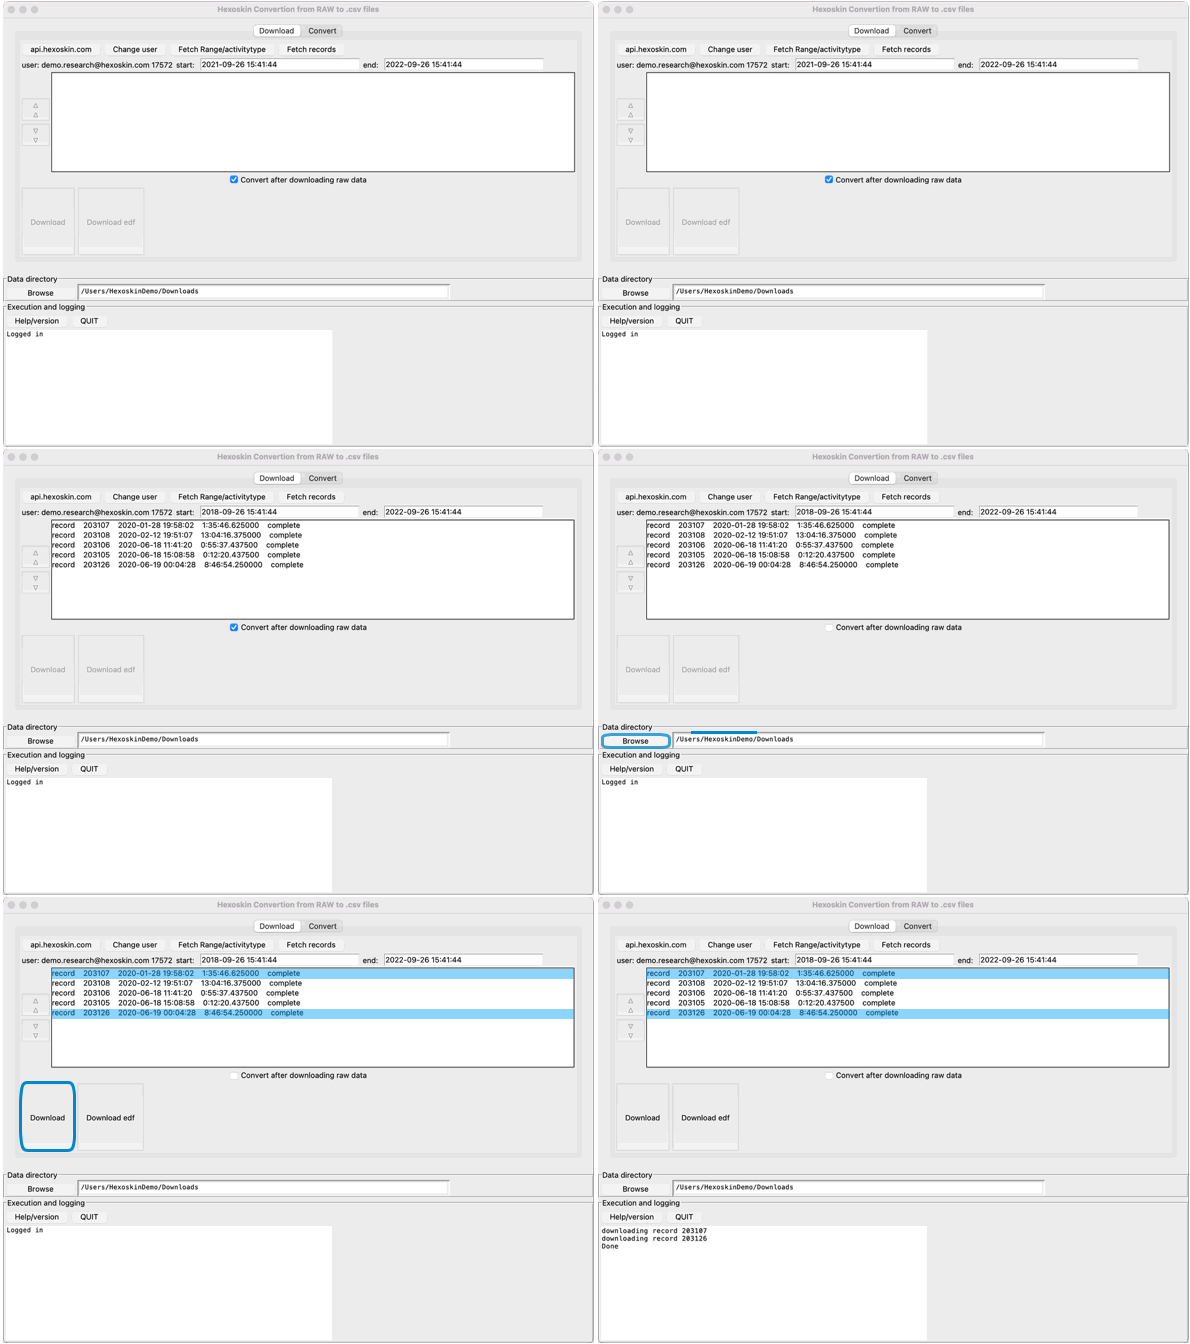
Next, filter and limit your search to the desired time range by setting a start and end date
-
Select the Fetch records (or Fetch Range for activities**).
**Note: To learn the difference between recordings and activities, please refer to this article. Ranges/ActivityTypes need to be tagged before using this tool (see this article). -
A list of records (or activities)*** will appear in the list.
***Note: Records are identified by their records IDs, User accounts are also identified by their account ID. - Uncheck the box "Convert after downloading raw data" (see further for the conversion steps).
- In the Data Directory, choose the folder where you want to save your records. In the Data Directory specified, a folder will be created labeled with the User_## (this number is your user ID generated by Hexoskin, this is not your account username). In this folder, there will be the record(s) labelled record_#### (or range_#####).
- In your list of fetched records (or ranges), select all the records (or ranges) you wish to download (specific ones or all). Click on a selected record to deselect it.
- Select Download or Download EDF and the records will start downloading. The download progress will be shown in the Execution and Logging section.

B) Converting Existing Records
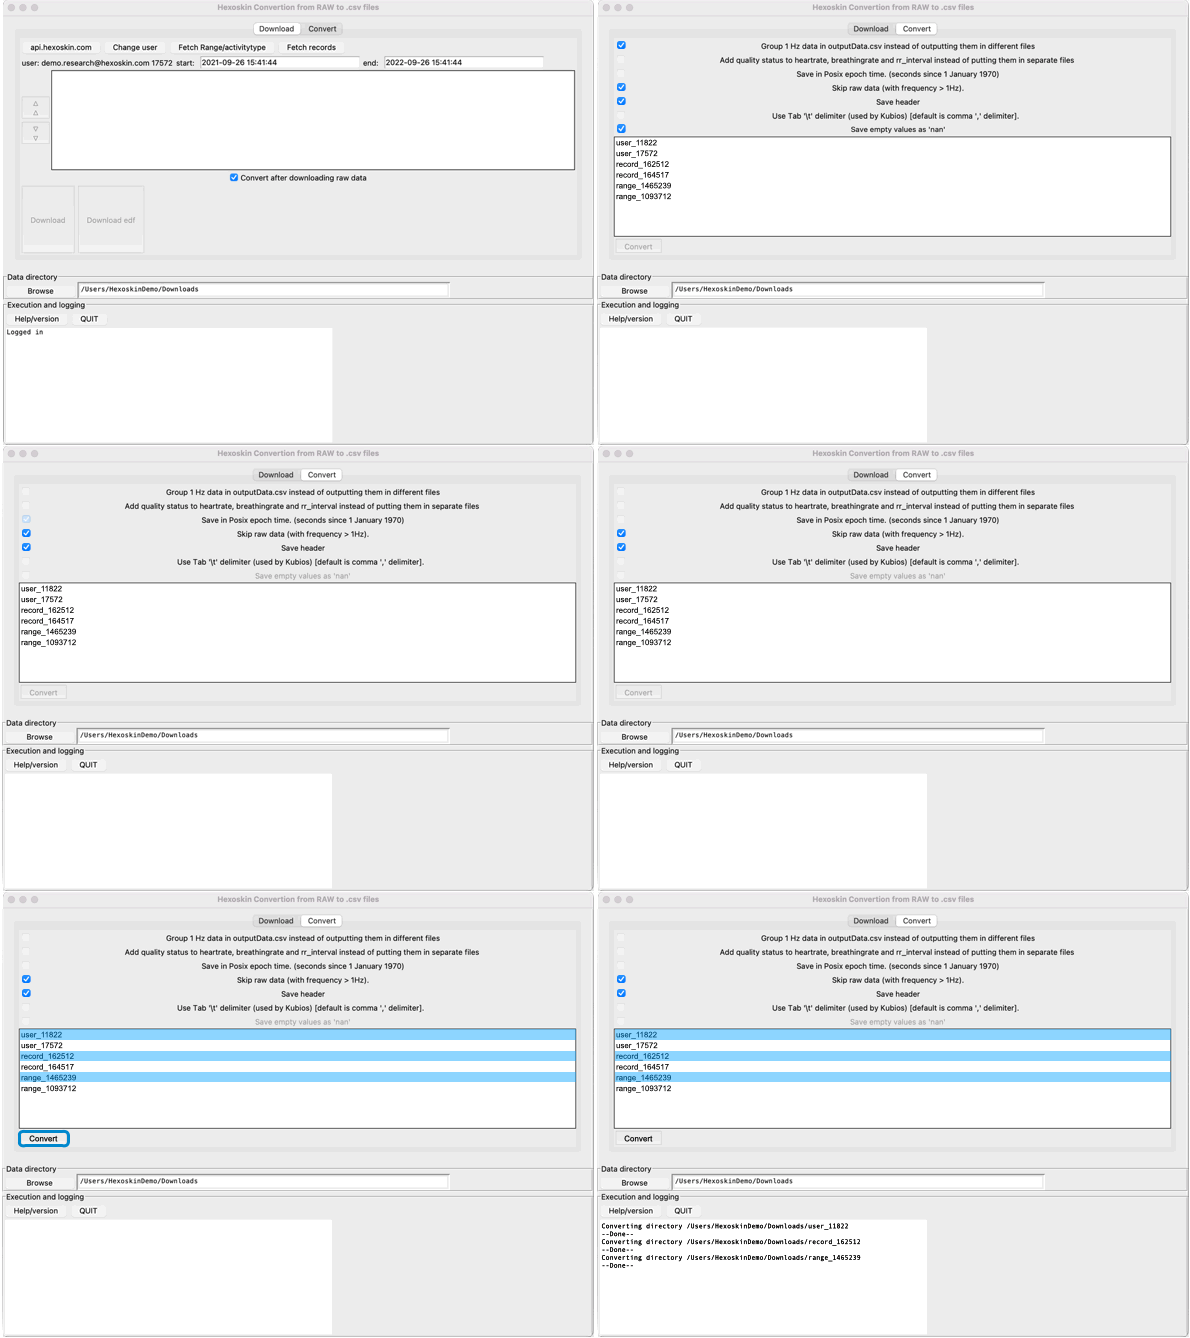
On the Convert section of the software, you can convert records that have already been downloaded by HxConvertSourceFile or from the Hexoskin Dashboard. Before you start, you need to choose the options for conversion:
- Group 1 Hz data in outputData.csv instead of outputting them in different files: This option will allow you to download and group all the data with a 1 Hz frequency sampling rate. After the download, you will be provided with a file displaying the heart_rate, heart_rate_quality, energy_mifflin_keytel (i.e. energy expenditure), breathing_rate, breathing_rate_quality, activity, cadence, and systolic_pressure (only available with Astroskin data). If you also unchecked the "Skip raw data with frequency > 1 Hz" option, you will be provided with a second file displaying all the raw data, including ECG_I (ECG_II and ECG_III will are only available with Astroskin data), respiration_thoracic, respiration_abdominal, acceleration_X, acceleration_Y, and acceleration_Z.
- Add quality status to heartrate, breathing rate and rr_interval instead of putting them in separate files: This option will allow you to download and group the heart_rate, breathing_rate as well as rr_interval data with their respective quality status data within the same file. For instance, after the download, you will be provided with a "heart_rate.csv" file that will display both your heart_rate data as well as your heart_rate_quality status data in one unique file.
- Save in Posix epoch time. (seconds since 1 January 1970): This option will allow you to convert the time unit from "seconds" into Posix (or Unix) epoch time. By default, the “time [s]” column corresponds to the elapsed time in seconds since the beginning of your record/activity. To find the start date and time of your record/activity, open the "info.json" file, the start date and time are indicated under "start_date". Please note that this "start_date" is indicated in the GMT time zone. However, if you checked this box, your time column will be displayed in Unix (or Posix) epoch time (i.e. the number of seconds that have elapsed since January 1st, 1970 at 00:00:00 GMT). To convert this Unix (or Posix) epoch time to normal time, you can use an epoch & unix converter.
- Skip raw data with frequency > 1 Hz: This option is selected by default. When this option is checked, it means all the .wav files will be converted to .csv format except for the raw data, including ECG_I (ECG_II and ECG_III will are only available with Astroskin data), respiration_thoracic, respiration_abdominal, acceleration_X, acceleration_Y, and acceleration_Z. If the box is unchecked, these raw data** files will also be converted to .csv format.
**Important note: Including raw data in the conversion may increase data processing time. Please note that the data conversion may take up to 1 min per hour of data. - Save header: This option is also selected by default. It will display the name and unit of each column in the downloaded files. For instance, in the heart_rate file, the header will display "time [s]" at the top of the first column and "heart_rate [bpm]" in the second column.
- Use Tab '\t' delimiter (used by Kubios) [default is comma ',' delimiter]: Check this box if you wish to report your data in .txt format. This option can be combined with any other conversion options.
- Save empty values as 'nan': This option is only available if the "Skip raw data with frequency > 1 Hz" option and the "Group 1 Hz data in outputData.csv instead of outputting them in different files" option are both selected. Any empty value will be displayed with the mention "nan".
To convert records that have already been downloaded :
- Authenticate.
- Click on the Convert tab.
- Choose your conversion options (checkboxes).
- In the Data Directory, select Browse and choose the folder* that has your records. You can also choose the User_## to select all the records in that user's directory (folder).
- Now, select all the records, ranges (activities) and/or user's directories you wish to convert. Click on a selected item to deselect it.
- Select Convert, and the conversion progress will be shown in the Execution and logging section.

*Note: You might have to create one folder per participant (i.e. one folder containing all records and/or activities for the same participant, but individual folders for each and every record and/or activity). Please note that a record folder has to be named "record_XXXX" and an activity folder has to be named "range_XXXX". HxConvertSourceFile will only recognize these name tags.
C) Downloading and Converting Multiple Records
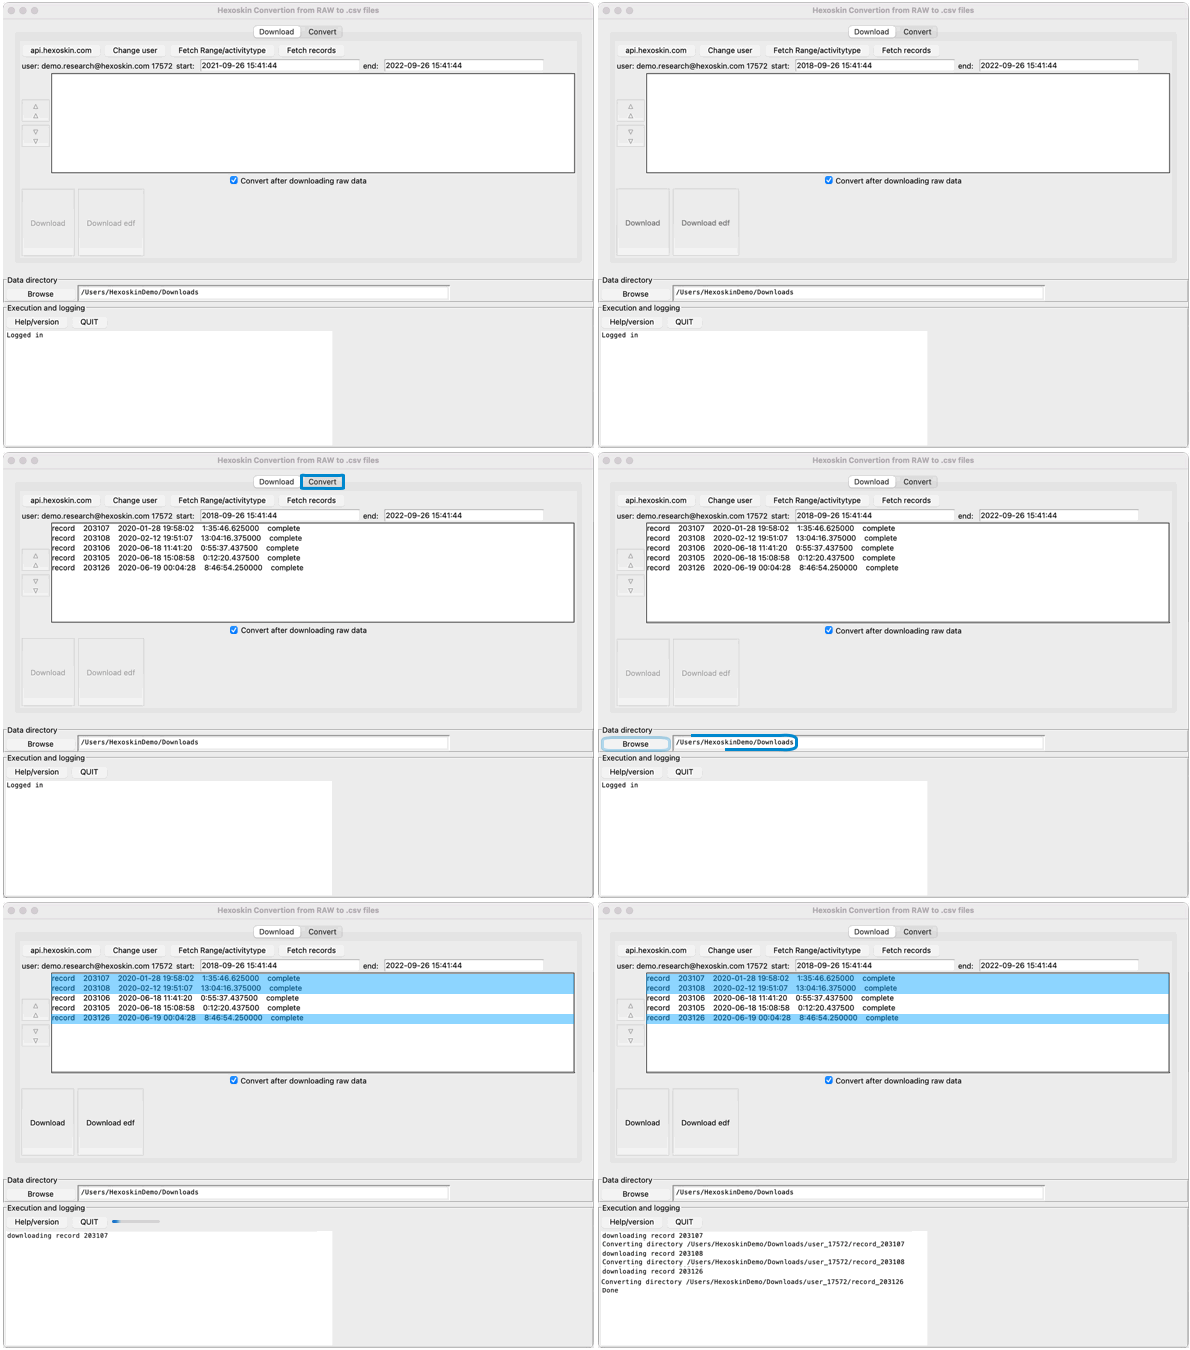
To download your record(s) and convert them at the same time, follow the steps below:
- Authenticate.
-
Filter and limit your search to the desired time range by setting a start and end date.
- Select the Fetch records (or Fetch Range for activities**).
- Make sure the option "Convert after downloading raw data" is checked.
- Click on the Convert tab.
- Choose your conversion options (checkboxes).
- Go back to the Download tab.
- In the Data Directory, choose the folder where you want to save your records.
- Now, in your list of fetched records (or ranges), select all the records (or ranges) you wish to download (specific ones or all). Click on a selected record to deselect it.
- Select Download. The download progress will be shown in the Execution and Logging section.
