
Before You Begin Ensure you have completed the following setup steps:
- Assign your device: Your Hexoskin Recorder must be assigned to your user account.
- Pair via Bluetooth (Optional): If you plan to use the mobile app, ensure your device is paired. (Note: Your Hexoskin device can also record independently without the app).
Connecting and Starting a Recording
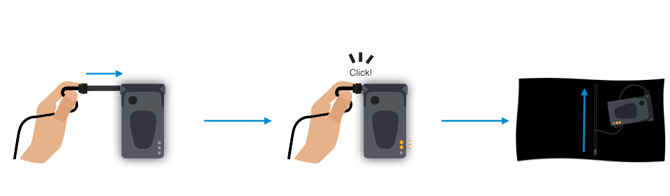
- Plug it in: Connect the Hexoskin Recorder to the Shirt Connector. The device will start recording automatically as soon as it is plugged in.
- Check the light: Verify that the middle orange LED turns on and stays lit. This indicates that your recording has successfully started.
- Stow the device: Slide the Hexoskin Recorder horizontally into the shirt's side pocket. Ensure the wire is pointing upward and the LED lights are facing away from your body.
Disconnecting and Ending a Recording

- Remove from pocket: Pull the Recorder out of the side pocket.
- Unplug safely: To avoid damaging the cable, place your thumb on the end of the connector and push gently to release the connection, then use your other hand to pull the connector out of the Recorder.
- Wait for shutdown: Once disconnected, the data recording will stop immediately, and the device will automatically shut down after 60 seconds.
- Protect the cable: Tuck the Shirt Connector back into the zipped side pocket to protect it.
You are now ready to charge your Hexoskin Recorder and synchronize your data via Hexoskin OneSync.