
Timeline
The "Timeline" tab displays the history of your Records and Activities.
In the section Filter, you can use ![]() to narrow down your search for Records or Activities to a specific or custom time range. Tick the box « Show Activities recorded with Hexoskin App » to display only the Activities that were launched via the Hexoskin App.
to narrow down your search for Records or Activities to a specific or custom time range. Tick the box « Show Activities recorded with Hexoskin App » to display only the Activities that were launched via the Hexoskin App.
-png.png?width=670&height=51&name=mceclip0%20(1)-png.png)
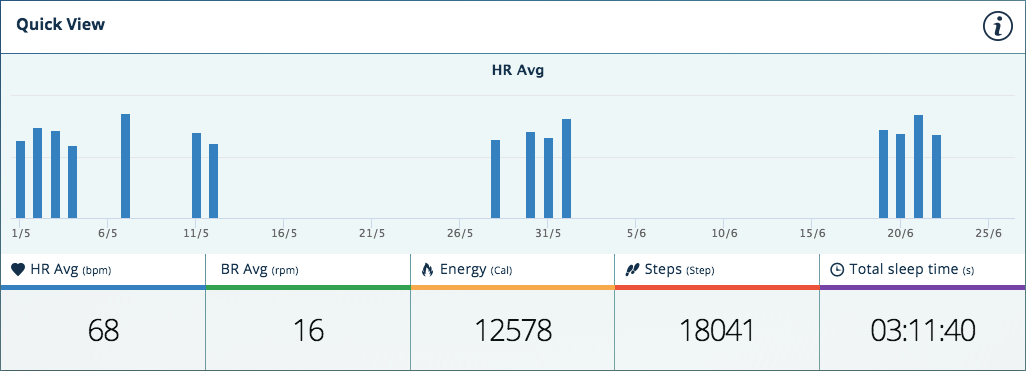
In the section Quick View, the chart shows the heart rate average (metric by default) for the time range set in the filter section (Last Record by default). Click on the other metrics to have them displayed in the chart. Change the time range in the Filter section.
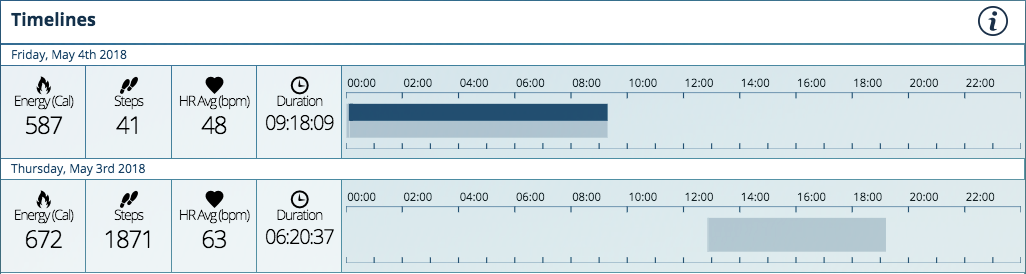
In the section Timelines, you will find the summary of the metrics for your Activities or Records and a timeline that displays when the Records/Activities took place (i.e. boxes on the timeline).
A Record is represented by ![]() , while an Activity is represented by
, while an Activity is represented by ![]() . Since an activity corresponds to a range of data extracted directly from a recording, the activity boxes will be displayed as superimposed boxes on the recording boxes (
. Since an activity corresponds to a range of data extracted directly from a recording, the activity boxes will be displayed as superimposed boxes on the recording boxes (![]() ). To directly access the Record of your choice, click on
). To directly access the Record of your choice, click on ![]() . To directly access an Activity, click on
. To directly access an Activity, click on ![]() .
.
Calendar
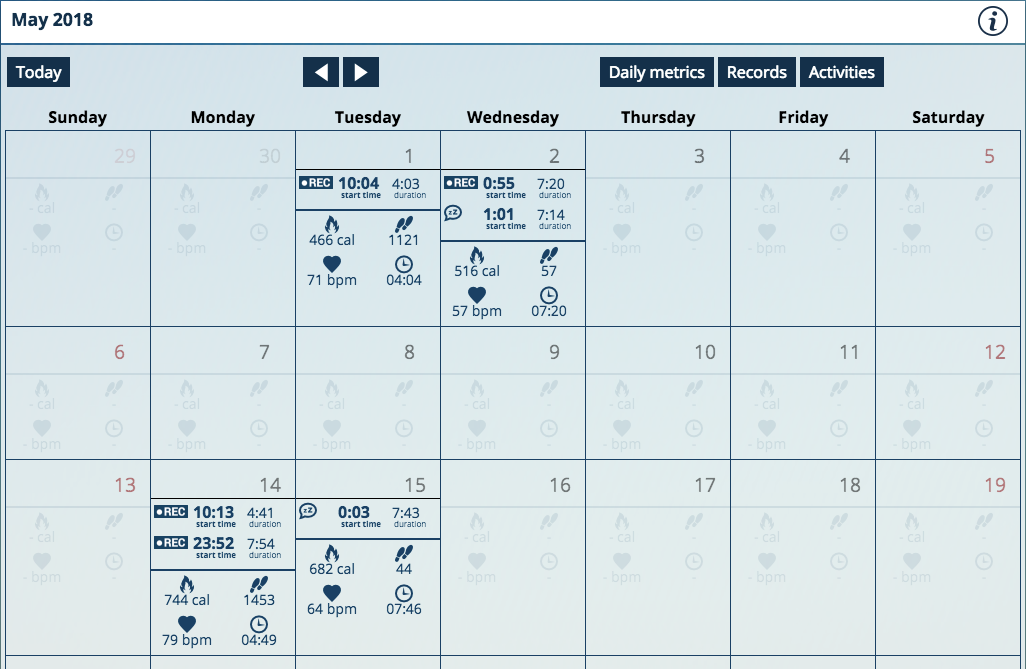
The "Calendar" tab displays your records, activities and/or daily metrics month by month.
Every Record is represented by ![]() , while each Activity shows up as a symbol that graphically represents a specific activity (for example,
, while each Activity shows up as a symbol that graphically represents a specific activity (for example, ![]() is for a sleep activity). To directly access the record of your choice, click on
is for a sleep activity). To directly access the record of your choice, click on ![]() and for an activity, click on
and for an activity, click on ![]() or any other activity-specific icons. Click on
or any other activity-specific icons. Click on ![]() to navigate between months. Click on Today to return to the current month.
to navigate between months. Click on Today to return to the current month.
Health Status
The "Health Status" tab displays metrics indicative of your health condition.
The Cardiorespiratory Status metrics will be registered only if you perform and complete the Fitness Tests on your Hexoskin App.
-png.png)
Your height and weight can be manually input, whereas your BMI will be automatically calculated. You can also manually input your thoracic and abdominal measurements, and based on these, the Hexoskin servers can recommend a shirt size for an optimal fit.

The Sleep metrics will only be calculated if Sleep activities were performed and tagged as such.
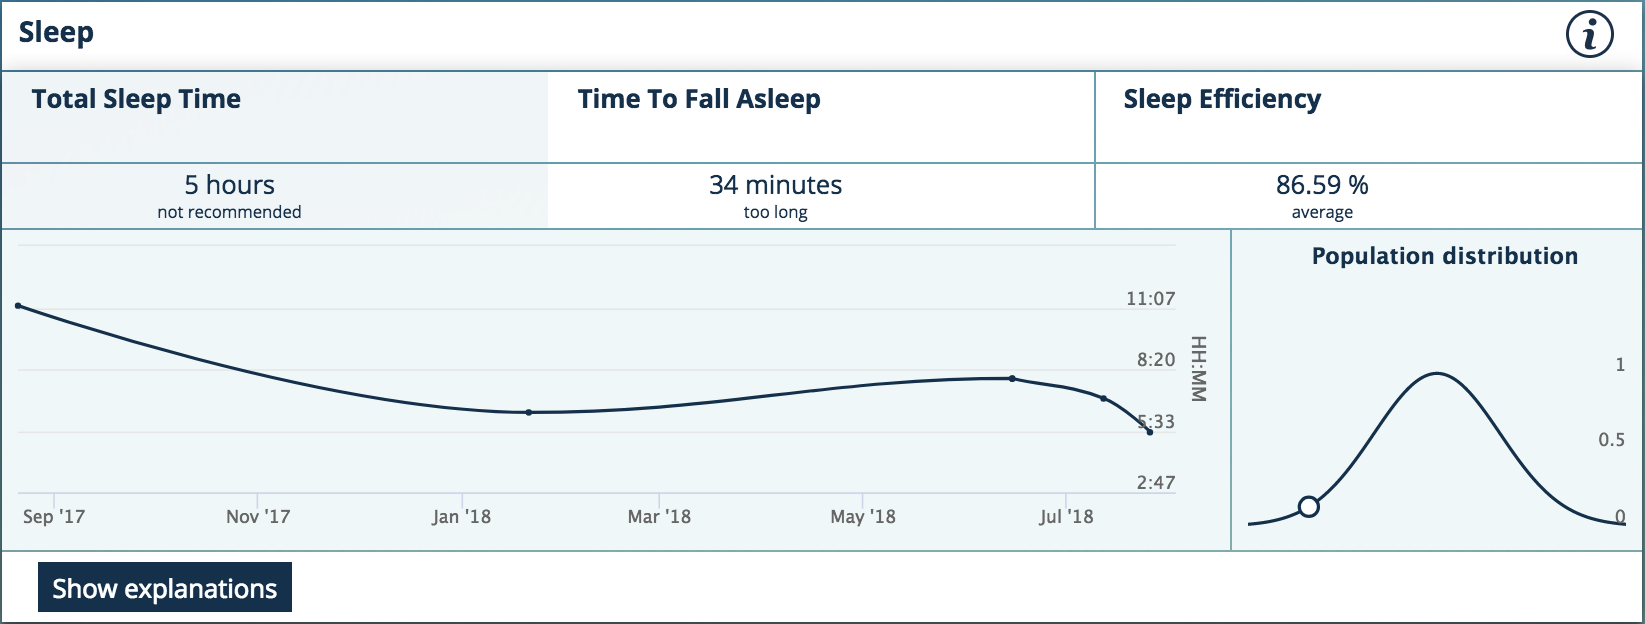
The graph allows you to track the history of the metric of your choosing and the progression of your health condition. Please note that it takes at least 2 data entries for each metric for a graph to be generated.
In each section, you can click on the points on the graph.
-png-3.png)
A pop-up window will appear allowing you to view or delete the data. You can also access the activity itself by clicking on ![]() .
.
-png.png)
The bell-shaped curve represents the population normal distribution for the selected metric. The point on the curve corresponds to your position in regard to the population’s value for that specific metric.
You can click on “Show explanations” to get more details on how to understand your data.
Activities
The "Activities" tab allows you to narrow your search to activities only.
In the section Search activities, you can narrow your search to a specific user, activity type, time range or even duration of your activity.
-png.png)
In the section Activities, you can access your activities. The number of activities per page can be changed if need be. The ![]() is to view an Activity, the
is to view an Activity, the ![]() is to download the data from the Activity (under .csv, binary or EDF format) and the
is to download the data from the Activity (under .csv, binary or EDF format) and the ![]() is to permanently delete the Activity from the account. Navigate from page to page by clicking on the page button (1, 2, 3, etc.) or with
is to permanently delete the Activity from the account. Navigate from page to page by clicking on the page button (1, 2, 3, etc.) or with ![]() buttons at the bottom of the Activities list.
buttons at the bottom of the Activities list.
-png.png)
Records
The "Records" tab allows you to narrow your search to records only.
In the section Search Records, you can narrow your search to a specific user, time range or even duration of your record.-png-1.png)
In the section Records, you can access your records. The number of records per page can be changed if need be. The ![]() is to view an Record, the
is to view an Record, the ![]() is to download the data from the record (under .csv, binary or EDF format) and the
is to download the data from the record (under .csv, binary or EDF format) and the ![]() is to permanently delete the Record from the account. Navigate from page to page by clicking on the page button (1, 2, 3, etc.) or with buttons
is to permanently delete the Record from the account. Navigate from page to page by clicking on the page button (1, 2, 3, etc.) or with buttons ![]() at the bottom of the Records list.
at the bottom of the Records list.
-png-1.png)
Settings
The "Settings" tab allows you to manage the information of your account and the views to be displayed.
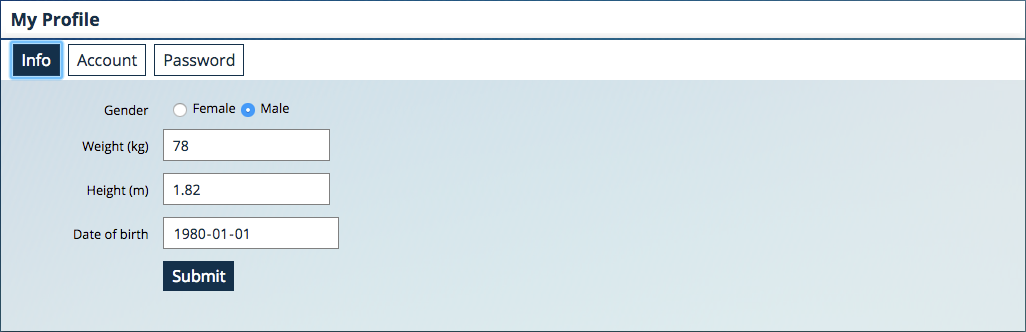
Under My Profile, click on Info and you will have access to your demographic information associated with your account. This information is crucial to the calculations of different metrics by Hexoskin. Make sure that they are accurate. Also, this is where you can update your weight over time if you are following a diet for example. You will be able to track the progression of your weight loss in the "Health Status" tab. In a research setting, the demographic information can be input differently to respect participant privacy and confidentiality (please refer to "Managing multiple users for a research project" in the Articles Section).
Under My Profile, click on Account and you will have access to the credentials associated with your account.
-png.png)
Under My Profile, click on Password and you will be able to change your password.
-png.png)
Under Preferences, you can activate or deactivate the different views that are displayed on your Dashboard. To save your preferences, click on "Update My Preferences".-png.png)